Friday 31 October 2014

HUGE Halloween/ Homeware Haul!

Hola people!

I have SO many amazing items to show you! I know this post is very last minute, considering today is Halloween (WOO!). 
But, I thought I'd show them nonetheless.
And hopefully, you managed to pick up some of the same items! 
(Beware...photo heavy post coming up.)

First up: Asda!

In my opinion, Asda had the BEST Halloween section. All items I bought were either £1, £2 or £3. Nothing was higher than that! BRILLIANT!
I was in my element buying all the homeware things that had skulls all over them, as not only are they perfect for Halloween, but they're excellent to use in mine and Scott's future place! Like it or lump it dear...skull dinner plates it is ;)


I bought double of the plates, bowls, plastic tankards and goblets, but of course, it's only necessary to show one of them.
The items are pretty self explanatory in the pictures, but I can't stress enough, just how impressed with it all I was. For someone so obsessed with skulls as I am, everything I bought is absolutely perfect! <3

Next items are from Poundland!


3 tealight lanterns, The Nightmare Before Christmas nail varnish and earrings, plus the funky black and white skull tinsel you see in the background. Which of course, I'll be using for Christmas! :D

Next...The Range!


The tinsel is from a seller on eBay. It's beautiful, and matches my black and white skull tinsel above. Appropriate for both Halloween and Christmas in my mind.
The set of 5 Skulls was £3! Bargain. And the 'Happy Halloween' sign; £1. There wasn't a great deal I liked in The Range this year. Honestly, when I was searching in the Halloween aisle, I heard about 4 hanging witch and ghost decorations all going off and making the same noises at different intervals...I swear, if my outrage was filmed, the Psycho shower scene music would go perfectly with my psychotic break. ;)

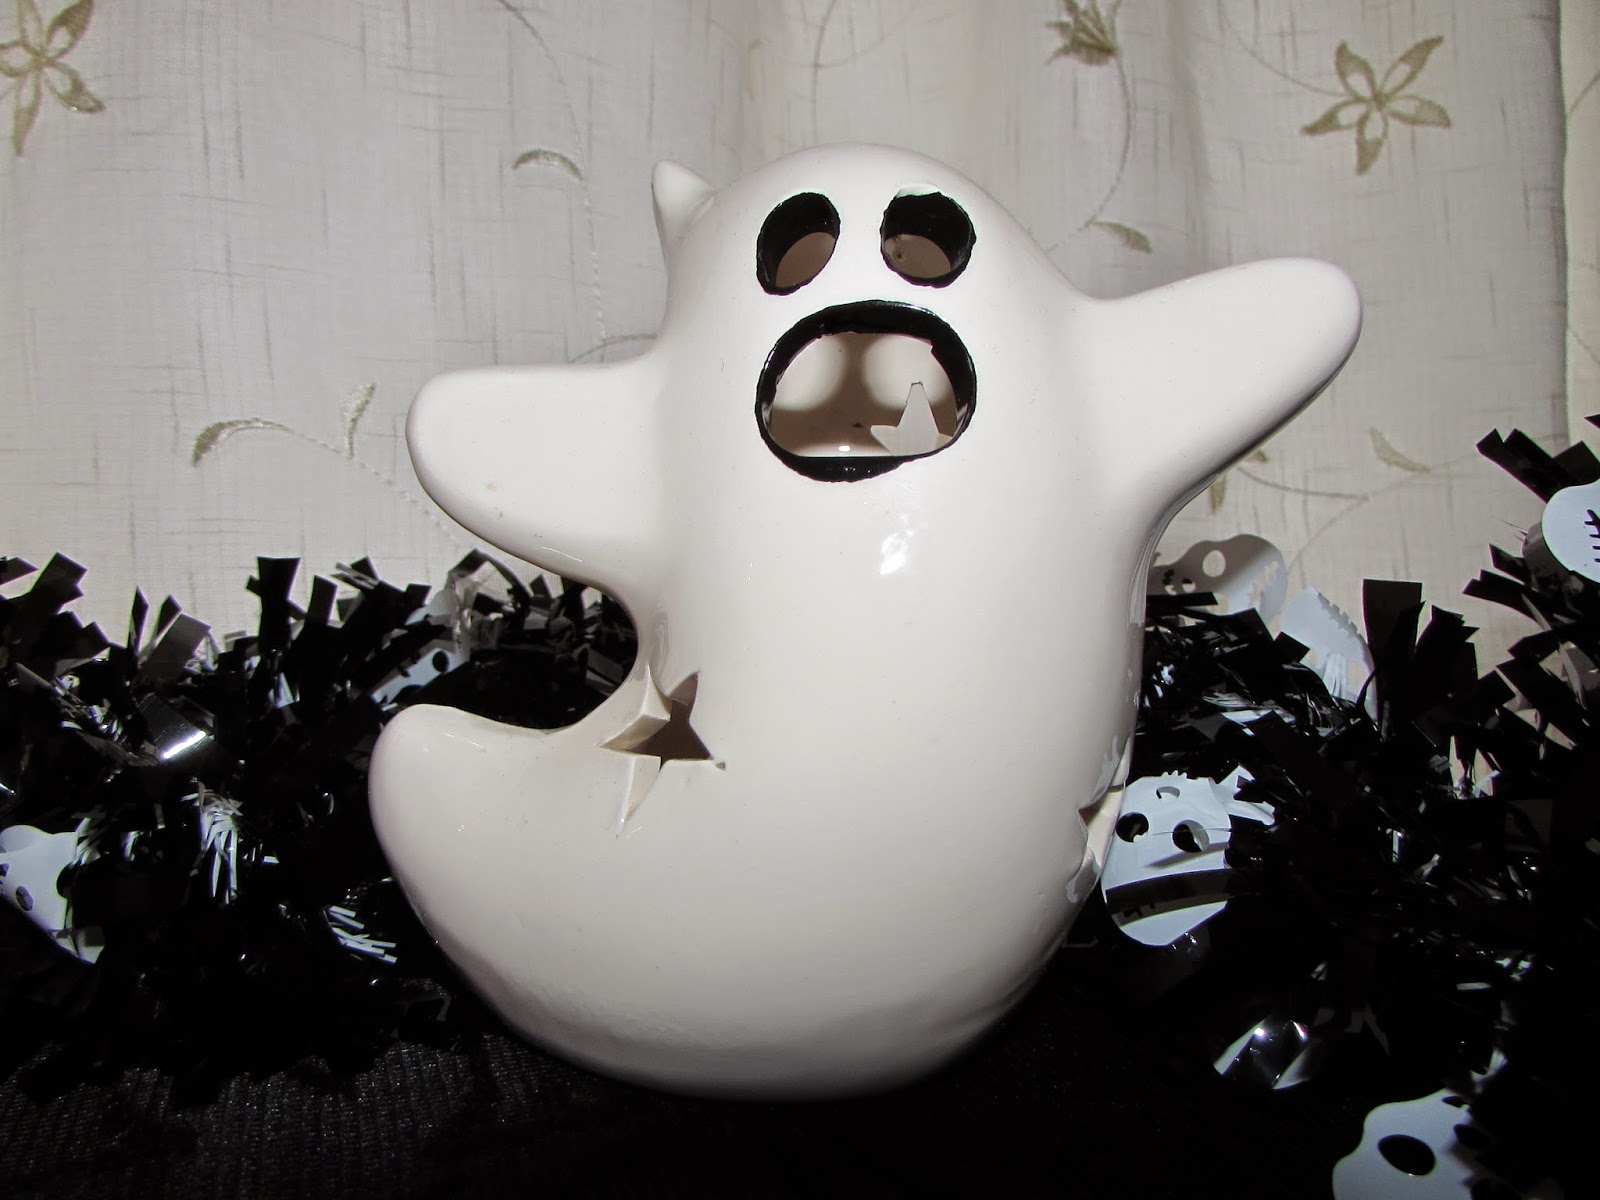
I got these after a mad dash to Morrisons!


Again, most of these items were either just over £2 or less. WOO WOO! I can't describe to you how loud my pure screech of joy was, when seeing the HUGE skull jug!


And lastly, but certainly not least...my purchases from the Disney Store!!


A JACK SKELLINGTON HEAD COOKIE JAR!! OMG!
*hyperventilates* 
It's so beautiful. I literally stared at it with so much love when I spotted it in the store. When I unveiled it to my mum and boyfriend, I stroked and cuddled the jar lovingly and looked at their faces which basically said "typical Bex."
*ahem* I'm not weird...promise...;)

The items in the Disney store were of course much more money than the supermarket decorations. But if you love Disney, and particularly Jack Skellington, then like me, you think it's worth it :)

I hope you enjoyed looking at these AWESOME Halloween goodies!! Perhaps you have the same ones? :) I much enjoy staring at them myself.

HAPPY HALLOWEEEEEEEEEN!!

Rock on!
Bex. xx
*Insert imaginary funky drawn skull here*

SHARE:

Wednesday 29 October 2014

Bex's Beastly Looks!

Hola people!

It's getting so close to Halloween and I'm loving it! Halloween films are on TV, the stores are filled with horrific tricks and treats and people are well underway with sorting their scary costumes.
I've seen maaaany posts on Halloween make-up for adults, but not many for the little monsters (who will soon want to be knocking peoples doors and stuffing their faces with sweets, resulting in a sugar high near bed time, driving their adults crazy....) aka: the kids!!

So, with the help from my beautiful but crazy niece, Lauren, I've created 3 scary yet simple looks using only 4 colours with Snazaroo - the best face paint in the world for adults and kids alike! (I'm not paid to say that, I swear! :P)


I originally intended to make as many scary looks as possible, using a 6 colour limit but there was only so much we could get done in one day due to normal everyday commitments!

The colours will be pretty obvious from the pictures, but with each look, I'll explain what techniques I used to create the look. Here's a link to where I buy my own Snazaroo paints that are cheaper than the actual site...Click Here!
Of course, if you prefer to buy from their site, feel free! Link right here...Snazaroo!
**TIP: To wet the paint, but not too much as it can get messy, I put water into a squirty bottle (easily bought from Superdrugs) to spray onto the paint. Not only is it easier, but it covers the paint entirely with one spray, so you dont have to mix it and struggle to get the right consistency all the time.**


First up...A SKULL!! 
(Perfect, considering my love of them!)

I used Black and White. Basic! 
The Grey shadows on the face are made by blending the black and white with a brush. As you probably guessed!
Key components to achieving a skull: 
>Blackened eyes (circular)
>Hollowed cheeks
>Teeth effect along the mouth

Steps:

1. Paint the whole face white.
2. Black out the eyes.
Depending on how old your child is (and in my own experience) it's better to do a rough circle around the eye and colour it in only slightly close to the eye, seeing as younger ones aren't too keen on keeping perfectly still when you're aiming a paint brush at their eyes! Haha. For older ones (or yourself) you can aim to get as close to the eye as possible to achieve maximum effect.
3. Draw a line (lightly) from the temple, curved around and away from the apple of the cheek and back down, just away from the corners of the mouth. 
4. Using a make-up brush blend the black line into the white to create shading. This gives a more ghostly and gaunt appearance. It can take a lot of shading if you're a perfectionist, but if you're intending to this quick, just go for it.
5. Draw two triangular shapes, a small width apart on the tip of the nose and colour them in. Make them big enough to look like a skulls non-existent nose!
6. The hardest part of the skull look is probably having a steady enough hand to create the lines for the teeth. I start of by drawing 4 rounded little squares directly in the middle of the lips. 
**TIP: Make sure they're nice and white beforehand as you don't want to go back afterwards and add white bits in between the black lines.**
From the main teeth, using a thin paint brush, create the other teeth by drawing rounded little squares, each leading on from the previous tooth. It joins them, and also helps you to create a steady set of teeth. If they're odd-ish shapes, don't worry! I'm pretty sure no deathly skull has perfect teeth :P
7. Draw short vertical lines from the teeth to look as though the teeth are rooted. Not needed if you're aiming for a very basic look...but it definitely adds definition and character! Lastly, add little jagged lines on the forehead and possibly on the chin, to look like cracks!


SKULL: COMPLETE!!
It may seem like a lot of steps, but once you try it, you'll see how easy it can be. 
**TIP: An easy outfit to accompany skull face paint...dress all in black! The attention will be drawn to the amazing, yet scary, face paint on your child. ;)


Next...A classic, scary WITCH!!
(The easiest one too!)
Key components to achieving a Witch:
>Green face
>Wrinkles and moles
>Heavy brows

Steps:
1. Cover the face in green paint.
2. On the back of your hand, mix some Black and White paint to make Grey. Use this to draw wrinkles on the forehead, beside the eyes (crows feet), the sweeping cheek lines (see picture) and the chin. I added some grey shading under the eyes too, to create an even older look.
3. Add little blobs of either brown or black paint on various places to look like moles and draw little hairs sprouting from them.
4. Lastly, use black paint to create a VERY heavy brow (the uglier the better in mu opinion!) and colour the lips in. I drew a tooth on the bottom lip, to again make my niece look old and haggered! 


WITCH: COMPLETE!


Lastly, my nieces favourite...A WOLF!!
Key components to achieving a Wolf:
> Fur effect using a stippling brush (if possible)
> Wolf/Animal nose
> Menacing Wolfy fangs

Steps:
1. To create the fur effect on the face, I used a Real Techniques Stippling Brush which has perfect bristles to lightly dip in the paint, and brush over the outside of the face. The longer bristles which are spaced apart, mean that you can use just the tips of them to give a fur/hair effect. I used black paint to do this.
2. Then, using a face sponge or foundation brush, colour in the rest of the face white, being careful not to smudge or get too close to the black already on the face. Using your stippling brush again, dip it into the white paint, and lightly go around the face, very close to where the black is, to start making it grey. You want to get a nice black, to grey, to white shading effect going on. Using the brush again, dab it into the white paint and finish off any gaps around the face. (See picture)
3. Using the black paint, draw on your doggy shaped nose. I draw a line across the tip of the nose, and then colour it in. I then draw a line down from the nose to the top lip, and a line across the lips to finish it off.
4. Add a thin black line across the eyelids and direct it slightly down either side of the nose, to add a bit of definition.
**TIP: You could always add fake blood if you wanted a really gruesome look!**


WOLF: COMPLETE!! 

I hoped you enjoyed these looks! I apologise for how long this post is, seeing as reading instructions can be quite tedious.
Comment below, or tag me on Twitter or Instagram to share your face paint looks and especially if you've tried my looks above! 
Let me know what you think!

HAPPY HALLOWEEEEEEEEEN!!
Rock on!

Bex. xx
*Insert imaginary funky drawn skull here*


SHARE:

Tuesday 21 October 2014

Gloss and Polish!

Hola!

Today, my sis and I went to get our nails done. A treat we don't have too often, but when we do, we absolutely love it.
We've been to the same place 3 times now and have had the very lovely Emma work on our nails. People...she is a nail genius!
The results are always amazing and are a brilliant price.
The atmosphere is friendly and relaxing and you are guaranteed to have a great conversation amongst yourselves, the technicians and other clients. 
Plus, more importantly, you'll leave with TO-DIE-FOR nails! ;)

We always go for Gelish, which is so professional and beautiful, I dare any woman not to be impressed with them. There is such a huge range of colours and nail art available so of course, they have something to fit everyone's preferences.
They last for ages. When I have Gelish nails, I never have to worry about them chipping, or scratching. The only thing you will notice, is the gap at the root of your nail as it starts to grow over time. Then, you can hop along to the salon again when you can, to get the old taken off, and new put on!

Big sis went for a french manicure (which always looks beautiful on her) just in time for her 1st Wedding Anniversary celebrations! <3


And I went for my usual love of black! Only this time, they're more pointed (LOVE it) and wait for it....THEY'RE SPARKLY TOO!


They look perfect for Halloween, if I do say so myself :P

You can see the sparkles more in this picture:


Seeing as I live in Kent, we go to Serene Indulgence Nail & Beauty Salon, located within a Hairdressers, based in Crayford.
If you're reading this and you live within the Medway Towns, Gravesend or Dartford, I urge you to go to these ladies!
Links: Facebook and Twitter.

Or, if you'd like to specifically work with Emma (because she's awesome) you can find her on her own Spa, Beauty and Personal Care page named Gloss and Polish, on these links: Facebook and Twitter
She offers many amazing treatments, so be sure to take a look at all the wonderful beautifying bits and bobs! ;)

If it's Gelish that you're mainly interested in, you can always go to their website and search for a salon in your area which uses the Gelish polishes. Though, be sure to enter your town and then 'UK' after as the search is set on the US when first clicked. Link below.
Gelish Store Locator.

That just about covers it! And if you do go and follow these links and see my nails on the page, be sure to comment! :D

I hope you enjoyed my review. Be sure to check out my two previous posts!
Until the next one, rock on!

Bex.xx
*Insert imaginary funky drawn skull here*


SHARE:

Wednesday 15 October 2014

I Feel Glossy...Oh So Glossy!

Hola people!

It's been just over a week since I posted for the first time and honestly, I'm disappointed I didn't post more within that week. I had a slightly rough week with my joints, but now I'm over that (and feeling less sorry for myself :P) I aim to post more! I'm intending to buy a brand new camera tomorrow too, so hopefully that'll give me a better chance to post some awesome pictures of my upcoming shopping hauls and Halloween make-up looks! Excitiiiiiiing!

Ok, so when I was in year 11 at school, I first discovered Glossybox online. I was watching make-up tutorials on YouTube and saw a link in the column. I clicked and WOW, was I intrigued. 5 beauty/hair products each month in a beautiful box, for just £10! I wanted to subscribe so badly. Although, I wasn't getting much money to myself at the time, seeing as I was in school and didn't work. So, I vowed to subscribe when I had money in the future....and January this year...I DID! I have loved each and every box so far (give or take a few products I wasn't keen on) and it's one of the most exciting things for me each month when I know it's Glossybox's dispatch day! That is, if the postman decides to be kind and brings them to me quickly... ;)

A monthly Glossybox review is something I thought would be great for the blog once I got it up and running. So, this Octobers box is a limited edition Pop Art box! There are 3 different variations for the cover.
I received the pink haired version.


There were 6 products in the box this month whereas it's usually 5. Bonus!

Products:

(I received a small 5ml tester)

I've posted the links above to the Brands own website, should you want to buy them. But the link for Rimmel London's BB Cream is to Superdrugs.com where of course, it's probably much cheaper! We're not all rich, and I personally always try to find the cheapest option possible when buying beauty products, so don't be ashamed to do plenty of research to find the same items, only more affordable, so your bank account won't cry! Hahaha

I'm impressed with the items this month mainly because they're things I use on a weekly basis (some of them daily). 
I've heard of Rimmel, Ciate and So Susan before. However I've never come across the Nuxe Paris, Etre Belle or Yves Rocher perfume. I can't wait to try the face mask as it claims: "This intensive moisturisation treatment provides instant relief for even the driest skin and leaves you looking and feeling radiant." Just what every female needs!


The Etre Belle liplift peel sounds quite intriguing. I've never come across a lip peal before, but it sounds very beneficial, especially in the harsh autumn/winter months when all your skin wants to do is hate you. Perhaps this will become a new must have for my make-up bag?

Yves Rocher. The small tester of the perfume smells gorgeous! I'll be using my sacred 5ml tester very sparsely until I'm fortunate to have a bigger bottle! Hahaha


A little about the Nail Varnish. The colour is called Pom Pom! A beautiful coral/red which will definitely stand out against most colours of clothing. The Ciate nail varnishes are brilliant. I've had one before from a previous Glossybox and they last very well! Particularly good if you're lazy like me and don't constantly re-paint your nails when they seriously need it! :P 

The BB Cream and Mascara pretty much speak for themselves. The fact that the mascara is called 'Flutter' probably gives enough description as to what it does to your lashes! :)

Lastly, there is a new competition from Glossybox! Click HERE to be in with a chance of winning a Package Spa trip to Paris! Ooh la la! 
If you fancy checking Glossybox out for yourself too, and to get more details, check out their website: GlossyboxUK

I'll be using these products in the oncoming weeks and will probably do an updated post on how it was to use some of the new-to-me items. 
I hope you enjoyed my first Glossybox review! Thank you for taking the time to read!

Until next months GB arrival, Rock on!

Bex. xx
*Insert imaginary funky drawn skull here*


SHARE:

Monday 6 October 2014

A Little About Me...

Hola people! 

My name's Rebecca -more commonly known as, and preferably referred to as Bex- and this is my brand new BLOOOOOOG!

I started thinking about a blogging roughly a year ago. Although, nothing ever came of it as I wasn't too confident that I'd have many exciting things to share, or that I would be that invested in regularly updating things online (as I'm a little bit dreadful). In some ways, I suppose that's good, as my life doesn't revolve around the Internet. However, creating a blog I feel will MAKE me more invested and hopefully will bring at least a little bit of joy to people who take a look at what's going on in my life! :) 

As the blog name suggests, I have a VERY eclectic taste. So much so, that when I eventually have my own house one day, it'll be a wacky, quirky, completely batshit crazy world! ;) Just the way I like things.


I hope to blog about many things! Plus-size fashion, arts & crafts, make-up, Glossybox reviews, shopping hauls, annual occasions, family, outings etc etc. You get the idea!

One thing, that I feel is very important to mention is my disability. It's a big part of my life, however it doesn't define me. I will be blogging about it, seeing as I hope to reach out to others who may suffer with the same as me, or even if you have a disability in general - whatever it may be! :)

Ok...a little bit about the D word. I suffer from may things, however the most predominant thing is Hyper-mobile Joint Syndrome. I've suffered with it since I was just a few months old and it basically means that the joints in my body are hyper-mobile. They dislocate easily and can bend in angles they're not supposed to - causing extreme pain. I also have M.E and scoliosis in my spine. I need a new body! But, all things considered, I manage pretty well. There are some days my body refuses to get out of bed (I bet you're thinking yours does too! ;)) and days where I sleep for 18 hours straight and still feel exhausted the next day. Life has it's ups and downs, but it's made me stronger every day. I use crutches constantly (because my hips are dodgy and painful) and on some occasions, a wheelchair. 

No. That does not mean it's fun when my other half teases he's going to let me go when going down a hill.... *raises eyebrow at said person* Hahaha.

When I met my other half Scott, I knew he was exactly that. My missing half. Without him I'd be less confident, less loved and completely lost.

I currently live at home with my mum, (and my adorable cat, Cairo! I love Egypt, so don't hate on the name ;)) but am hoping to move home within the next year or so! I'm looking forward to that new chapter of my life with Scott. 
I have a big sis who is as crazy as me. Well, so are her husband and two kids. I'm very close with my niece, Lauren and nephew Jack and we frequently enjoy making up songs, making crafts, driving the family nuts and being loud. And I wouldn't have it any other way!
My mum is one of the strongest people I know, and has encouraged me to be confident in life and go after what I want. Even if that means leaving the nest which of course, WILL be the end of the world for her. Bless her heart.


Top picture: Scott. Middle: Lauren & Jack. Bottom: Scott & I.

I hope people will find my blog funny, inspiring, and a joy to visit...hopefully making them return more and more!
I'm looking forward to seeing where my blogging journey takes me!

Until then, rock on!

Bex. xx
*Insert imaginary funky drawn skull here*
SHARE:
© Eclectic Bex. All rights reserved.
Blogger template by pipdig